|
I will admit it, I have been wrong about using Auto ISO. If you attended one of my DSLR Basic Photography classes, I preached that you should always control the ISO setting and taught my ISO Escalator. I am now a convert to using Auto ISO and replacing the ISO Escalator, goodbye old friend. For those who don’t know what the ISO Escalator was, it was a method for determining and selecting the proper ISO in low-light situations. However, one of the principles remains, setting the camera in Shutter Priority (“Tv” or “S” on the mode dial). Shutter Priority locks in your preset shutter speed, which can prevent blurred or unsharp images, instead the camera adjusts the aperture automatically, to ensure a proper (or close to correct) exposure. After changing the mode dial, select a shutter speed that will stop the action or allow you to hand-hold your camera. Usually, a 1/60th shutter speed will stop most action and shake, however, a higher value may be necessary for faster action, or shakiness from too much coffee. In my ISO escalator, you would take test pictures at different ISO settings, until the photo exposure was to your liking. However, with advances in ISO technology and Denoise tools (ie Lightroom has a great AI Denoise tool), there is less need to worry about higher ISO settings.
Auto ISO can be set using the same menu for changing ISO settings. With your shutter speed set, you can just enjoy photography, focusing on your composition, knowing that your exposure is being handled by your camera. As the light changes, the ISO will automatically adjust, increase, or decrease the value.
Suggestion: Always take a brief look at your photo image on the backscreen to ensure the exposure is correct. Use Auto ISO in low-light situations such as museums, restaurants, and indoor plays and sports. In addition, use Auto ISO when shooting street photography, where the light can change from bright sun to dark shade when turning a street corner. Once again, set your camera to Shutter Priority and select an appropriate shutter speed, for instance, 1/125. Manual Mode and Auto ISO: If you want to control both your shutter speed and aperture, you can use Auto-ISO to maintain balance in the “exposure triangle”. For instance, you might select 1/125 shutter speed and want a mid-range (f8) aperture for your street photography. Noise: We mentioned “noise”, a subtle to great degradation in image quality often due to increasing in ISO, caused by many technical factors, too complex to discuss here. In B/W film photography, we often embraced this “grainy” look, and will sometimes increase this in digital b/w photography. However, often we want smooth clean images, especially for large prints, so AI comes to our aid. Lightroom has a feature called AI Denoise, and Topax Photo AI is another option for removing noise in your images. In addition, newer cameras are better able to handle high ISO. Last note, we have noted that with Shutter and Aperture priority, the exposure will be close to correct. The optimal exposure may be a “stop” or “partial stop” difference because the light meter in your camera usually takes an average for the given light situation. A “stop” is one shutter speed or aperture in either direction. In conclusion, you can retire the ISO Escalator and embrace Auto-ISO to enhance your photography. Hey, we are still learning even after ten years of teaching. An article that can further explain Auto-ISO, How to Use the Auto ISO Setting in the Best Possible Way | Fstoppers My classes and Adventure Workshops mentioned in the article included:
0 Comments
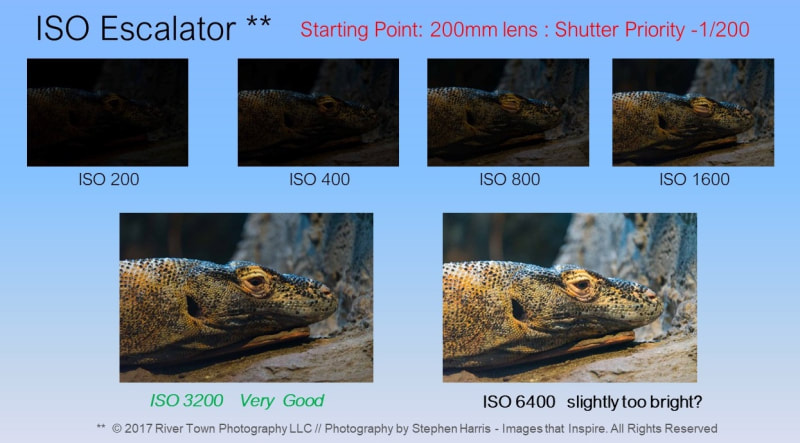
One of the challenges in photography is shooting in low light situations. How do you take creative and beautiful photographs in museums, concerts, gymnasiums, restaurants or other places where you don't have (or don't want) a tripod and using a flash is not permitted? Let me introduce you to the "ISO Escalator" technique. To my knowledge, this is a term that I coined a few years ago when I began to teach students how to leverage ISO to handle low light photography. If you want to learn more about ISO in general, review ISO Settings in Digital Photography, Digital Photography School. One note on using Flash in low light situations. Don't! Flash kills the mood, may not be permitted and will annoy everyone around you. Also, please turn off Auto ISO. The concept for the ISO Escalator is to determine the slowest shutter speed that you need for your shots, and yet be fast enough to avoid shaky/blurring pictures. Then determine what the best ISO to use, based on a room or space that is perhaps the darkest situation you plan to shoot at. Imagine being in restaurant with just the ambient lights turned low for a nice mood. That is most likely your average or worst case lighting. In a Gallery or a Museum, one of the rooms where there may not be ambient light from outside windows. Once you determine the correct ISO, you should be able to shoot in the space (and adjoining rooms) without thinking about anything but your composition. In our workshops, we teach that it is important to keep photography fun. This technique allows you to have fun, while knowing your photos are likely to come out looking nice, without the typical blur-shakiness we have all experienced. This is an example of using the ISO Escalator in a reptile room at a Zoo.
Let's get started:
In the example above in the reptile room. I was using a 200mm lens, so I set my shutter to 1/200th - and worked my way up the escalator (now you know why I call it the ISO Escalator). At 3200, the subject looked well lite. I went one more stop (ISO 6400) and thought it was too bright, so I reset my ISO back to 1600 - and focused on composing pictures in this darkened room. Recap: Try it yourself in your dining room or other interior space, with the lights dimmed.
Let me know if this simple technique has helped you to improve your low light photography. |
Categories
All
|
|
© 2024 River Town Creative, LLC - /dba Photography by Stephen Harris - All Rights Reserved
|


