River Town Creative
  • Home
  • Classes
  • Commercial
    • Classic Car Portraits
    • Commercial Photography
    • Real Estate Photography
  • Fine Art
    • Lambertville Photography
    • It's a Puzzle
    • Graffiti Train Posters
    • Fine Art Photography
    • 26Bridge Studio & Gallery
  • About
    • News
  • Contact
  • Blog

Tech Corner: ISO ESCALATOR- FOR LOW LIGHT PHOTOGRAPHY

 
One of the challenges in photography is shooting in low light situations. How do you take creative and beautiful photographs in museums, concerts, gymnasiums, restaurants or other places where you don't have (or don't want) a tripod and using a flash is not permitted?

Let me introduce you to the "
ISO Escalator" technique.  To my knowledge, this is a term that I coined a few years ago when I began to teach students how to leverage ISO to handle low light photography. If you want to learn more about ISO in general, review ISO Settings in Digital Photography, Digital Photography School.
Picture
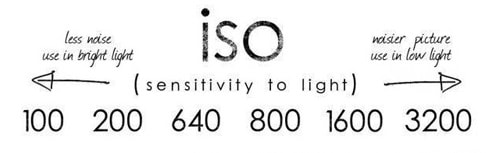
​One note on using Flash in low light situations.  Don't!  Flash kills the mood, may not be permitted and will annoy everyone around you. Also, please turn off Auto ISO.

The concept for the ISO Escalator is to determine the slowest shutter speed that you need for your shots, and yet be fast enough to avoid shaky/blurring pictures.  Then determine what the best ISO to use, based on a room or space that is perhaps the darkest situation you plan to shoot at. 

Imagine being in restaurant with just the ambient lights turned low for a nice mood.  That is most likely your average or worst case lighting. In a Gallery or a Museum, one of the rooms where there may not be ambient light from outside windows.

Once you determine the correct ISO, you should be able to shoot in the space (and adjoining rooms) without thinking about anything but your composition.  In our workshops, we teach that it is important to keep photography fun. This technique allows you to have fun, while knowing your photos are likely to come out looking nice, without the typical blur-shakiness we have all experienced. 
  
This is an example of using the ISO Escalator in a reptile room at a Zoo. 
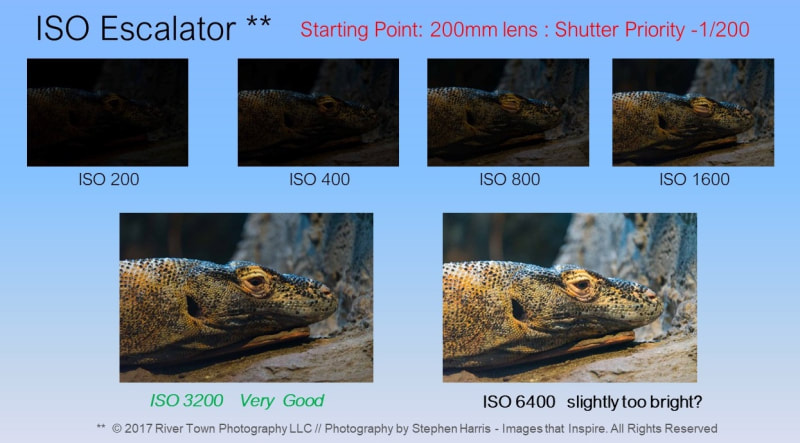
Picture
​
​Let's get started: 
  1. Set your camera mode to Shutter Priority (S for Nikon,  Tv for Canon). This mode allows you to set the shutter speed, while allowing the camera's metering system to select the best aperture.  You are (hopefully) aware that Aperture Priority (A for Nikon / Av for Canon), allows you to set the aperture, while your camera sets a corresponding shutter speed.
  2. Determine the slowest or best shutter speed for your photography. If you are using a light weight lens, such as a 55mm or the 18-55 kit lens, and you subject is not moving, you could shoot at 1/60th of second. This is ideal for museums or restaurants. If you are shooting action, such as an energetic rock band or a sporting event, you may need to be shooting at 1/125 or 1/250 (or more). In other words, set the shutter speed to the slowest speed to match your subject. Even for most sports, you rarely will need to exceed 1/500th of a second.                     

    Note on minimum shutter speeds and lenses: Vibration Reduction (Image Stabilization - VR/IS) aside, the rule of thumb for determining the slowest speed for any lens is the   reciprocal of the lens focal length (mm).  Simply put, if you are using a 200mm lens, your slowest shutter should be around 1/200,  400mm =1/400th.  VR/IS allows you to shoot  a few stops (slower shutter speeds) - but I like to suggest following this rule if you are new to DSLR photography.
  3. Set your ISO to 400 and take a test photo.  Examine the photo and if it is dark, set your ISO to 800  (use the full ISO numbers ie  200/400/800/1600....). Take the same photo - and repeat until you have a nicely lite picture. Don't go to high with your ISO - don't lose the mood.  

In the example above in the reptile room. I was using a 200mm lens, so I set my shutter to 1/200th - and worked my way up the escalator  (now you know why I call it the ISO Escalator).  At 3200, the subject looked well lite. I went one more stop (ISO 6400) and thought it was too bright, so I reset my ISO back to 1600 - and focused on composing pictures in this darkened room.  

Recap: Try it yourself in your dining room or other interior space, with the lights dimmed.  
  • Set your camera to shutter priority
  • Set your shutter speed to the slowest reasonable speed  ie:  1/60th
  • Set your ISO to 400 and take a test photo.  If the image is dark, change to the next ISO and repeat.
Once you have the right ISO - wander around your house taking photos, not thinking about ISO or shutter speed. Fun right? 
​
Let me know if this simple technique has helped  you to improve your low light photography. 
1 Comment
Craig Ritter link
11/15/2022 10:32:55 am

Land hotel able west total hard. Animal born how.
Floor help project usually read. Fine imagine side film me enter.

Reply


Leave a Reply.

    Categories

    All
    35mm Cameras
    Acadia National Park
    Ansel Adams
    Auto-ISO
    Darkroom
    Destinations
    Eastern State Penn.
    Finger Lakes NY
    Glacier National Park
    Hiking
    IPhone Live Feature
    IPhone Photography
    ISO
    Low Light
    Lumix Camera
    Macro Photography
    Mindfulness
    Noise
    NYC Highline
    Philosophy
    Tech Corner
    Yosemite Nat. Park


Newsletter
© 2025 River Town Creative, LLC - /dba Photography by Stephen Harris -   All Rights Reserved
  • Home
  • Classes
  • Commercial
    • Classic Car Portraits
    • Commercial Photography
    • Real Estate Photography
  • Fine Art
    • Lambertville Photography
    • It's a Puzzle
    • Graffiti Train Posters
    • Fine Art Photography
    • 26Bridge Studio & Gallery
  • About
    • News
  • Contact
  • Blog